Diode Markings Decoded: Reading the Numbers on a Component You Found in a Drawer
Diode markings: a three-step way to turn a printed code into a datasheet, why two-letter SMD codes are ambiguous, and what to do when nothing matches.
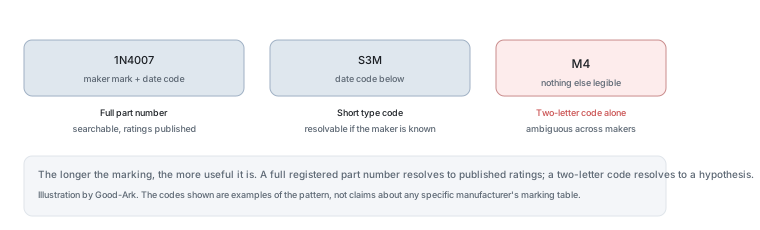
Sooner or later everybody ends up with a handful of loose diodes and no idea what they are. The codes on the body look like they should be enough, and sometimes they are — but the same short code can mean different parts from different manufacturers, which is the trap worth understanding before you trust a lookup.
What the printed codes mean
Three kinds of information usually appear on a diode, in whole or in part. A part number identifies the device. A date or lot code identifies when and in which batch it was made. A manufacturer’s logo or letter identifies who made it. On a large through-hole package all three often appear; on a tiny surface-mount part there may be room for only two or three characters, and the rest has to come from the package dimensions and the manufacturer’s marking table.
The analogy that helps is a car number plate. It identifies a specific vehicle, but you need to know which country issued it before you can look it up, and a plate from one country may look exactly like an unrelated plate from another. Diode codes work the same way: the code is only a pointer if you know who issued it.
Two-letter SMD codes and their limits
The smallest diodes carry the least information, and that is where identification fails most often. A two- or three-character code on a surface-mount package is defined by the manufacturer’s own marking specification, and different manufacturers reuse the same letters for completely different devices. A code that resolves to a 40 volt Schottky in one maker’s table can resolve to a small-signal switching diode in another’s.
Two further complications are worth knowing. The same device can carry different codes in different package sizes, because the code is chosen to fit the space available. And codes can be reused by the same manufacturer for different parts at different times, with the datasheet revision being the only way to separate them. The practical conclusion is that a bare two-letter code is a hypothesis, never an identification.
| Marking you can read | What it gives you | What it does not give you |
|---|---|---|
| A full part number such as 1N4007 | A registered type with published ratings | Which manufacturer made this unit, and which revision it follows |
| A longer alphanumeric string with a logo | Manufacturer and part, usually resolvable | The grade or screening level, unless the code encodes it |
| A two-letter code alone | A candidate list, once you know the manufacturer | Which candidate it is, without the maker |
| A date or lot code | When it was made | Anything about its electrical rating |
| Nothing legible | Package family and dimensions | Voltage, current and technology |
Date codes versus part codes
Date codes are the part of the marking that causes the most false confidence. A four-digit string that reads like a year and a week is a manufacturing date, not a rating, and treating it as a part number produces nonsense results. Common patterns include a two-digit year followed by a two-digit week, a single letter for the year with a week number, and lot numbers that encode the wafer batch rather than a date at all.
The practical rule is to separate the marking into a leading alphanumeric block, which is usually the type, and a trailing block, which is usually the date or lot. If the part number is only two characters, the separation is impossible from the marking alone, which is precisely why the two-letter case is unreliable.
A three-step reverse lookup workflow
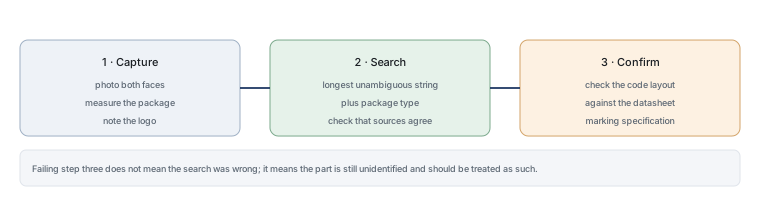
The workflow that actually resolves most loose parts has three steps, and the order matters because each step narrows the next.
Step one: capture the evidence before searching. Write down the full marking exactly as printed, including any logo, and note the package and its dimensions with a caliper or against a ruler. Photograph both faces under good light; a faded code is often readable in a photograph when it is not readable by eye.
Step two: search on the longest unambiguous string. If there is a full part number, search that. If there is a manufacturer mark and a short code, search the combination rather than the code alone. If there is only a short code, search it plus the package name and the word “marking”, then check whether the results agree with each other — a code that returns four different devices from four makers has not been resolved.
Step three: confirm against the datasheet marking specification. A datasheet’s marking section shows what the top of the part should look like, including the layout of the code and the position of the date code. If your part’s arrangement does not match, you have not identified it, whatever the search suggested.
How to confirm with a datasheet
Confirmation is a comparison, not a gesture. Open the datasheet for the candidate part, find its marking section, and compare three things: the characters, their arrangement on the face, and the position of the date or lot code. Then check the package drawing against your measurement. Both checks have to pass; a candidate that matches the letters but not the package has been guessed, not identified.
This is also the point where you can catch a re-marked part. If the code letters match the datasheet but the package dimensions are noticeably different, or the marking is applied in a way that does not match the specification, the most likely explanation is that the part is not what it claims to be. For a repair on a low-voltage circuit that may not matter; for production it matters a great deal.
When you cannot identify it
Some parts simply cannot be identified from the outside, and the honest response is to stop trying. If a two-letter code has no manufacturer mark, if the marking is worn, or if the code returns several mutually incompatible candidates, then the part is unidentified regardless of how much time you spend.
What you can still do is characterise it. Measure the forward voltage in both directions, note the package and dimensions, and if you have a suitable supply, find the reverse voltage at which it begins to conduct. That gives you a working envelope to reason from, and it is a great deal better than a guess with a part number attached. What you must not do is fit an unidentified part into a circuit where an error has consequences.
Three external references are useful when you want to check a marking convention or a package. The package families are described under diodes and surface-mount technology, and the measurement technique for confirming a polarity in our explainer on the multimeter. Component test methods come from JEDEC, marking and traceability expectations in production from IPC, documentation duties from ISO, and sector-level context from the Semiconductor Industry Association. Device and assembly background is published by NIST and IEC.
Safe default replacements
When a part cannot be identified but must be replaced, the safe route is to reason from the circuit rather than from the unknown part. What voltage does the position see, including transients? What current flows there? What package fits the footprint? What switching speed does the circuit require? With those four answers you can choose a part on its own merits, which is more reliable than matching an unidentified component.
The generic parts worth keeping in a drawer — a common rectifier, a common small-signal switching diode, a low-voltage Schottky and a small Zener — cover an enormous share of beginner and repair work, but each of them is a compromise. Our article on choosing between a Schottky and an ordinary diode covers the most frequently encountered version of that choice.
FAQ
How can I identify a diode?
Start from whatever marking is present and work outward. A full part number resolves directly to a datasheet. A shorter code needs a manufacturer before it means anything, so look for a logo or a distinctive package. If nothing is legible, measure the package, measure the forward voltage in both directions, and treat the part as characterised rather than identified. The three-step workflow above describes the order that works most often.
How do I tell which way a diode goes?
By the cathode band, which corresponds to the bar in the schematic symbol. That is a polarity question rather than a marking question, and our article on identifying the anode and cathode covers the package conventions and the meter check in detail.
Which side of a diode has the stripe?
The stripe, band or chamfer marks the cathode — the terminal that corresponds to the bar the triangle points at. It is worth restating because the opposite assumption is the most common beginner error: the marked end is not the positive end. For a bridge rectifier package the markings work differently again, and the terminal symbols rather than the geometry tell you which is which.
A two-letter code returned several different parts. Which one is mine?
None of them with confidence, until you can establish the manufacturer. Two-letter codes are defined per maker, and different makers reuse the same letters. If the package carries no logo, the practical options are to compare package dimensions against each candidate — which often eliminates some — or to treat the part as unidentified and choose a replacement from the circuit requirements instead.
Is a date code useful for identification?
It tells you when the part was manufactured, and that can be useful in two ways: it dates the revision of the datasheet that applied, and it warns you if you are looking at stock that has been sitting for a long time. It tells you nothing about the electrical rating, which is why mistaking a date code for a part number produces confusing lookup results.
What to do next
Sort the loose diodes in your drawer into three piles: full part numbers you can look up, codes with a manufacturer mark, and parts with nothing useful. The first pile is a reference library; the second needs a lookup; the third should be treated as unidentified stock and kept only for experiments where an error is harmless. The verification habits behind that sorting are set out in our guide to finding and verifying datasheets.
Send Good-Ark the code, the package and a photograph, and we can confirm the marking convention and the datasheet revision that applies to it.
Email sales@goodark.com, or start from the product family learning centre.
This article is published by Good-Ark, a manufacturer of diodes and other discrete devices. Marking conventions are described as general practice; two-letter codes in particular are defined by each manufacturer and must be resolved against that manufacturer’s own marking table.
Continue reading
Browse the Rectifier Packages and Circuit Design for related guides.
Recommended
 Why Does Your Phone Charger Get Warm?Knowledge
 Energy Efficiency Rules Worldwide: How Regulations Shape Component ChoicesKnowledge
 Wide-Bandgap Semiconductors: Adoption Report 2026Knowledge
 The GaN Charger Market: Why Your Next Adapter Is SmallerKnowledge
 Component Lead Times in 2026: What Is Actually Normal NowKnowledge
 China’s Power Semiconductor Industry: Where It Stands in 2026Knowledge