How to Spot Counterfeit Electronic Components: A Practical Guide
How to spot counterfeit components with four checks you can run yourself: packaging, laser marking, the part number against the datasheet, and a meter test.
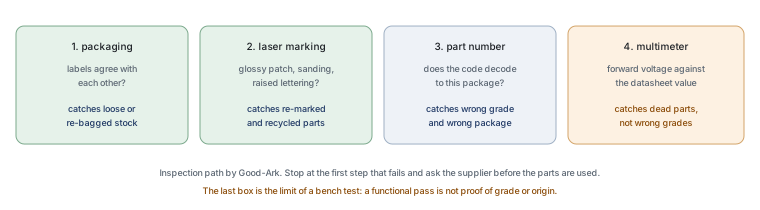
You can catch most counterfeits with nothing more than your eyes, a bright light and a multimeter. Four checks do the work: compare the packaging against the manufacturer’s own photographs, read the laser marking under magnification, look the part number up in the manufacturer’s datasheet, and measure the part against what that datasheet says it should do. None of the four proves a device is genuine, and together they catch the crude cases that make up most of what reaches small buyers.
Why counterfeits exist
Counterfeiting is cheaper than manufacturing. A part that already exists can be bought as surplus, harvested from scrapped equipment or made on a low-grade line and sold under a better name, and the only work is the relabelling. The economics are the same as turning back the odometer on a used car: the object is real, the number attached to it is not, and nothing on the outside tells you.
The word also covers more than most people expect. A counterfeit is rarely a completely different device that fails the moment you power it up. Far more often it is a lower voltage grade sold as a higher one, an older die revision sold as the current part, a component removed from a scrapped board and cleaned up, or a part that failed a screening step and was sold anyway. All four work on a bench, which is exactly why a prototype test does not detect them.
Check the packaging and reel
Manufacturers publish photographs, drawings and label layouts for their packaging, and comparing what arrived with what the manufacturer shows costs nothing. Look at the moisture barrier bag, the humidity indicator card, the desiccant, the reel or tube label and the carton label, and check that the part number, the quantity and the date code agree everywhere they appear.
What a fake tends to look like is vagueness rather than error. A label printed on a home inkjet, a font that is close but not identical, a barrier bag with no desiccant, a reel whose tape is generic rather than the manufacturer’s, or parts normally supplied on a reel arriving loose in a bag. Each of those can have an innocent explanation, and each is a reason to ask a question before the parts go onto a board.
Check the laser marking
The marking on a semiconductor package is the manufacturer’s identifier, and the manufacturer documents how to read it, usually in the datasheet or in a separate marking specification. A laser mark is burned into the surface: it looks slightly recessed, the edges are crisp, and it does not come off. Printed marking sits on top of the surface, and it can often be scraped with a fingernail or dissolved with a solvent.
The classic counterfeits are easier to see than to describe. Blacktopping covers the original marking under a new layer of epoxy, and it shows up as an uneven patch that is slightly glossier than the surrounding plastic, with a soft edge and sometimes a ghost of the old text visible at an angle. Sanding leaves fine parallel scratches and a dulled surface. Re-inking produces letters that sit slightly proud of the plastic. A ten-times loupe and a bright light reveal all three, and a phone camera in macro mode usually does the same job.
Look at the logo as well as the text. A manufacturer’s logo is a piece of artwork, and a copied one is usually approximate: the arc of a curve, the weight of a stroke, the spacing between letters. Compare it against the manufacturer’s own datasheet rather than against a product listing, because listing photographs are frequently borrowed from the genuine part.
Check the part number against the datasheet
A part number is not a name, it is a code. Most manufacturers embed the package, the voltage class, the polarity, the grade and the packing method in the string, and publish the rule that decodes it. If the number you received does not exist in the manufacturer’s own datasheet library, or if the code translates to a different package from the one in your hand, you have a decisive answer rather than a warning sign.
| Part of the code | What it usually means | What to verify |
|---|---|---|
| Series | The device family and its general function | That the family exists in the manufacturer’s library |
| Voltage | The blocking voltage class, for example 60 V or 600 V | That the class matches the order and the marking |
| Current or power | The rated current or the package power class | That it is consistent with the package in your hand |
| Package suffix | Through-hole, surface-mount, module | That the physical part matches the suffix |
| Grade or screening | Industrial, automotive-qualified, special screening | That the grade claim is documented, not implied by price |
| Packing suffix | Reel, tube, ammo pack, quantity per unit | That the packing matches what you ordered |
Searching a number is not the same as confirming it. Catalogues and marketplace listings copy part numbers from one another, so a number that appears on twenty pages proves only that twenty pages used the same source. The manufacturer’s own datasheet library is the reference, and if the part is not there, the question to ask is whether it ever was.
A simple electrical sanity check
Most multimeters include a diode test that pushes a small current through the part and displays a forward voltage in volts. For an ordinary silicon rectifier this is typically somewhere between 0.6 V and 0.8 V, for a Schottky diode it is lower, and for a Zener or a transient-voltage device the reading depends on the test current the meter uses. A part that reads open in both directions, or a short in both directions, does not need further investigation.
The honest limit of this test is that it only checks function. A counterfeit that is electrically similar to the real part will pass, because it is usually the same kind of device in a different grade or revision. Use the electrical check to eliminate the dead, and rely on the packaging, marking and part-number checks for the questions a bench test cannot answer.
Where the risk is highest
Counterfeits follow scarcity and price. Four situations concentrate the risk: parts that are obsolete or hard to find, because a genuine supply may barely exist; parts in shortage, because urgency pushes verification aside; prices well below every other seller, because a genuine part has a floor; and safety-related or high-value devices, because that is where the return is largest.
A low price is not evidence of a counterfeit, and a high price is not evidence of authenticity. The pattern that matters is the combination: a hard-to-find part, at a price below everyone else, from a seller who cannot say where the stock came from.
What to do if you already installed one
Quarantine first and investigate second. Mark the affected boards or the affected batch so they can be found again, record the supplier, the order and the lot code, and stop shipping while the question is open. If the part sits in a safety-related or warranty-relevant function, treat it as a suspect until the supplier answers in writing.
The value of the investigation is mostly in what you can prove afterwards. Ask for the lot code, and ask the manufacturer to confirm the channel in writing for that orderable number. If the supplier can produce both, the parts are documented even if they did not come from an authorised channel. If neither is available, the decision becomes commercial: the cost of recalling or reworking against the cost of the risk.
Ten-minute checklist
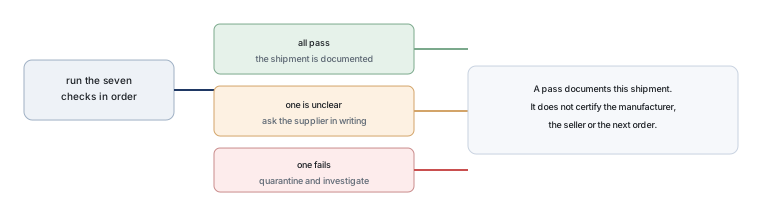
Run these in order and stop at the first one that fails.
- Compare the carton, bag and reel labels and confirm that part number, quantity and date code agree.
- Check for a humidity indicator card and desiccant if the package is moisture sensitive.
- Read the marking under ten-times magnification and look for a glossy patch, sanding scratches or raised lettering.
- Compare the logo and letter shapes against the manufacturer’s datasheet, not against a listing photograph.
- Decode the part number in the manufacturer’s own library and confirm the package and grade.
- Measure forward voltage with a multimeter and compare it with the datasheet.
- Compare price and availability against the general market. A large gap is a question, not an answer.
FAQ
How can you tell if a component is counterfeit?
By comparing it with the manufacturer’s own documentation at four points: the packaging and its labels, the laser marking, the part number decoded against the datasheet, and the electrical behaviour. A part that matches everywhere is documented against that documentation; a part that fails anywhere is a question for the supplier. No single check is conclusive on its own.
Is there an app that can identify electrical components?
There are apps that read markings with the phone camera and look the text up, and they are useful for reading a part number off a small package. What they cannot do is establish authenticity, because they read the same marking a counterfeiter prints. The scanning of a barcode or a QR code is a weaker check still: it confirms the label, not the part inside the bag.
What are the most common counterfeit items?
Counterfeiting follows value and scarcity rather than any particular product category, and the published studies use different methods, so a global ranking should be treated with caution. Within electronics, the parts most often reported are obsolete or hard-to-find devices, parts that were in shortage, and the higher-value power devices. That distribution is a description of incentives, not a measured league table.
Is a cheap part always a fake?
No. Surplus stock, end-of-life clearance and a seller who bought too much are all normal reasons for a genuine part to be cheap, and small sellers operate on thin margins. The reason price is still worth noticing is the opposite case: a hard-to-find part priced far below every other source has no obvious explanation, and asking for one costs a single email.
I have already soldered them in. What now?
Mark the boards so they can be identified later, record what you know about the lot, and ask the supplier for the lot code and for the manufacturer’s written confirmation of the channel. Then decide with the facts you have. If the function is safety related, or the product carries a warranty, the safe assumption is that a suspect part has to be replaced rather than watched.
What to do next
Pick the next order that arrives and run the seven checks on it before it goes into stock. The habit takes ten minutes and produces a written question whenever something does not add up, which is the only thing that separates a supplier who can answer from one who cannot. The purchasing side of the same subject, including how to choose a channel, is covered in buying components safely.
External references are worth keeping to hand: JEDEC publishes device test methods, IPC covers marking and traceability expectations for assemblies, ISO defines the quality management requirements a supplier is audited against, NIST publishes measurement and standards material, and the Semiconductor Industry Association collects sector-level work on counterfeit parts, including the background on electronic components for readers who want the general picture. Regulatory and quality background is published by the European Commission.
Send Good-Ark the part number, the marking photograph and the lot code, and we will tell you what the part should look like and which documents should accompany it.
Email sales@goodark.com, or start from the part-number confirmation guide.
This article is published by Good-Ark, a manufacturer of discrete semiconductor devices. It describes inspection practice for buyers and names no seller or platform as a source of counterfeits; it also makes no claim about the grade or origin of any particular shipment.
Recommended
 Why Do Diodes Get Hot? Conduction and Switching Losses ExplainedInfoStandard, Fast Recovery, and Schottky Diodes: What’s the Difference?Info
 What Is a Fast Recovery Diode? Understanding “Fast Recovery”Info
 What Is a Diode? A Beginner’s Guide to How It WorksInfo
 Automotive Semiconductor Report 2026: Chips Per Car Keep RisingKnowledge